AWX: The Poor Man's CI?
Nov 7, 2017 · 18 minute read · Commentsnfvpeansiblecontinuous integration
I’m just going to go ahead and blame @dougbtv for all my awesome and terrible ideas. We’ve been working on several Ansible playbooks to spin up development environments; like kucean.
Due to the rapid development nature of things like Kubernetes, Heketi, GlusterFS, and other tools, it’s both possible and probable that our playbooks could become broken at any given time. We’ve been wanting to get some continous integration spun up to test this with Zuul v3 but the learning curve for that is a bit more than we’d prefer to tackle for some simple periodic runs. Same goes for Jenkins or any other number of continous integration software bits.
Enter the brilliantly mad mind of @dougbtv. He wondered if AWX (Ansible Tower) could be turned into a sort of “Poor Man’s CI”? Hold my beer. Challenge accepted!
Get AWX Installed
The first thing we need to do is get AWX installed. Lucky for you, I already wrote up a blog post showing you how to consume some Ansible automation to get an OpenStack virtual machine up and running and populated with the fiddly bits of AWX. There is also the upstream AWX installation guides that you can follow to get AWX up and running in your environment.
So what are we trying to accomplish?
First, let’s step back and define what we’re trying to do. The goal here is to build something quick and dirty that would let us build configure some periodic runs of our Ansible playbooks. Some of the nice to have bits would be:
- easily run our existing Ansible playbooks / Ansible native
- run against some cloud infrastructure
- continue to work against our local virtual, KVM-based development environments
- give some historical record of successful and failed runs
- provide notifications to our Slack channel when things fail
So what don’t we want? Heavy infrastructure that we need to spend a lot of time maintaining. Long setup times. Large amount of yak-shaving (overhead) to get “something” up and going.
Because I was able to get AWX up and running in a short period of time through automation (see previous section about getting AWX installed), it seemed like AWX might fit the bill to fill in our complete lack of automation with “something”.
Spoiler alert!
Turns out, AWX makes a pretty decent little periodic testing system when used in conjunction with cloud infrastructure where your machines can be provisioned and deprovisioned through Ansible playbooks, and then layering your infrastructure deployment on top of that.
In our case, we wanted a twice-per-day deployment of kucean to run against the RDO Cloud, and for a failure notification to pop into our Slack channel when things stopped working.
I was able to build out just enough Ansible plays to make the whole thing work out, and was pretty impressed with how clean some of the separation of variables, facts, and other playbook specific data was. Notifications worked swimmingly, and the Workflow Template stuff did exactly what I hoped.
Now that we know things weren’t a complete disaster (much the opposite), you know it’s worth continuing to read on how we did it!
Building a minimal CI environment
Our minimal CI environment will be entirely deployed into an OpenStack cloud, where AWX will run, and will also have access to deploying virtual machines in the same cloud for our jobs (although it could easily be another cloud environment, project, etc).
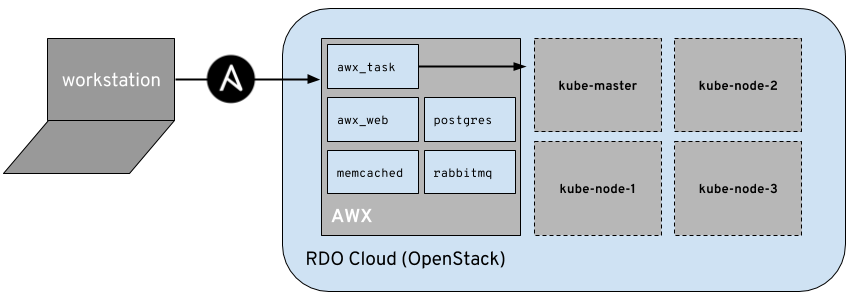
Our AWX environment will make use of my openstack-inventory-builder playbook which does the heavy lifting of creating our OpenStack virtual machines via a variable list. By using the playbook, we can create a job template for the provisioning and deprovisioning of the virtual machines that are agnostic to our deployment.
In the following sections I’ll show you how I setup AWX to periodically deprovision a set of virtual machine, reinstantiate them, run kucean against them to get a Kubernetes environment running, and report back to our Slack channel via notifications.
Creating the projects
In AWX, a project is an SCM (source control management) object that contains the Ansible playbooks you want to use in a job template. For our configuration we’ll be setting up two projects; openstack-inventory-builder and kucean.
To create these projects, we need to click on the Projects tab and click Add. We then need to fill in the fields like in the screenshot below.
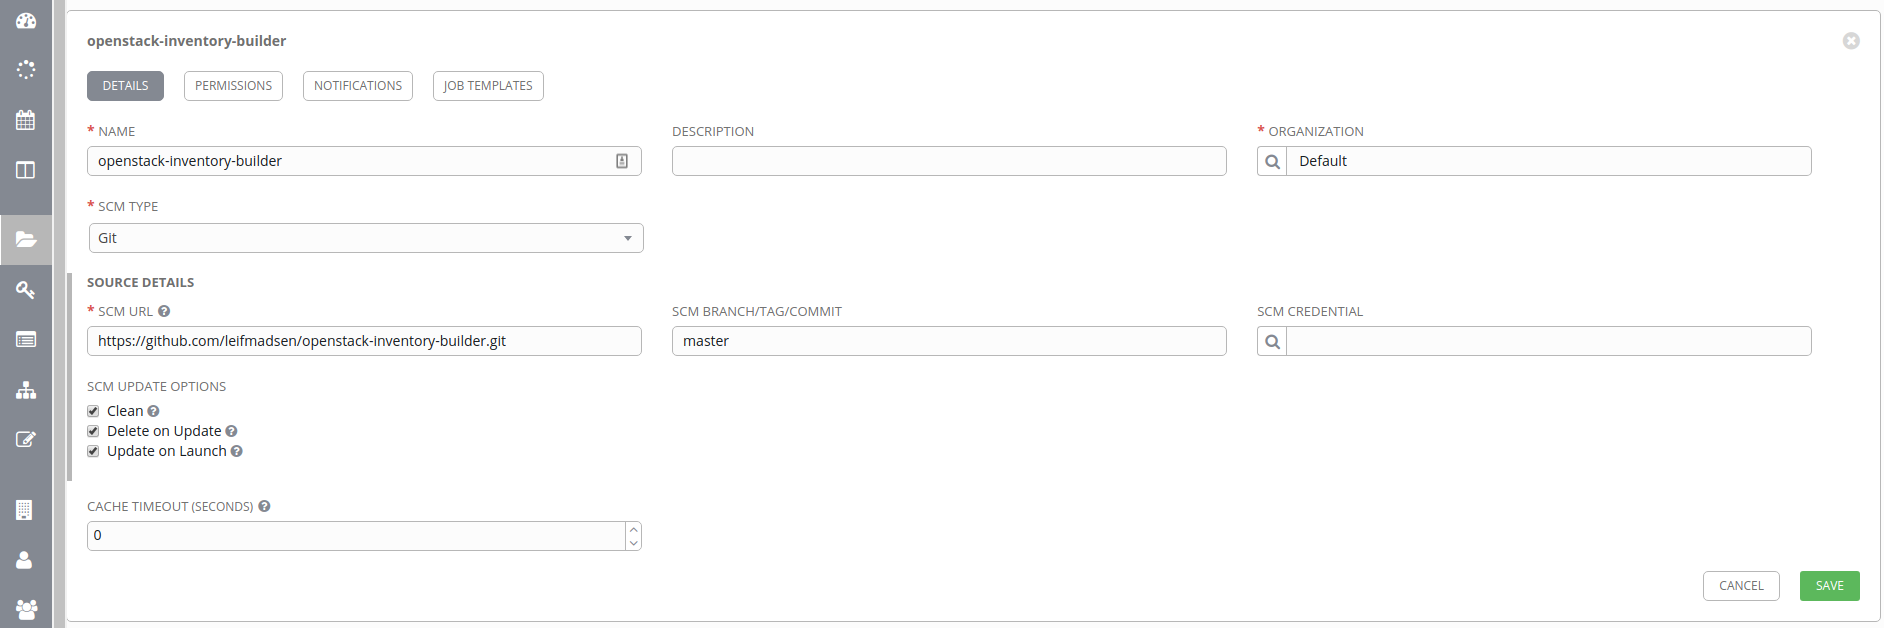
- name: a unique name for the project
- organization: just use the default organization for now
- SCM type: Git
- SCM url: the GitHub URL for the project (HTTPS connection)
- SCM branch/tag/commit: using master branch
- SCM update options
- Clean: reverts and local changes to the project / repo
- Delete on Update: delete the entire repo when performing an update
- Update on Launch: update the project prior to any job run using this project
We do the same setup for https://github.com/redhat-nfvpe/kube-centos-ansible,
which will leave us with 2 projects; openstack-inventory-builder and
kube-centos-ansible (aka kucean). We’ll use these 2 projects to instantiate
some virtual machines in our OpenStack cloud, and deploy a Kubernetes cluster.
Creating credentials
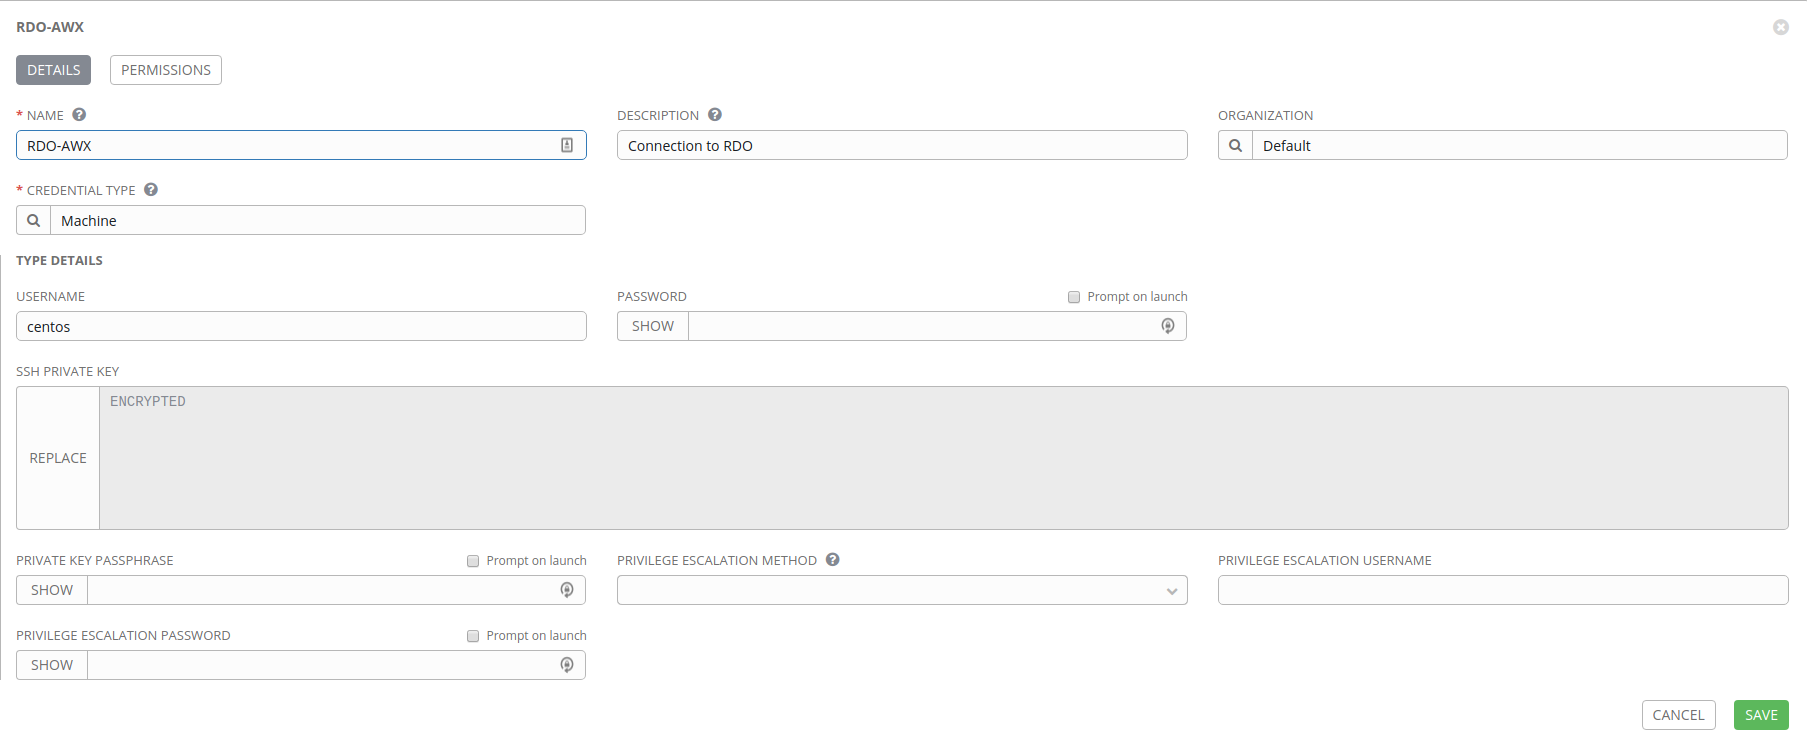
With our projects created, we need to build our credentials. We’re going to build three sets of credentials.

- Local: machine connection to locally run the Ansible playbooks on our AWX virtual machine
- RDO-AWX: machine connection that allows us to SSH into the resulting virtual machines in our OpenStack cloud
- RDO Cloud: OpenStack connection that allows us to operate against the OpenStack API to instantiate virtual machines
Local connection
Click on the Add button and create our Local connection like in our image below.
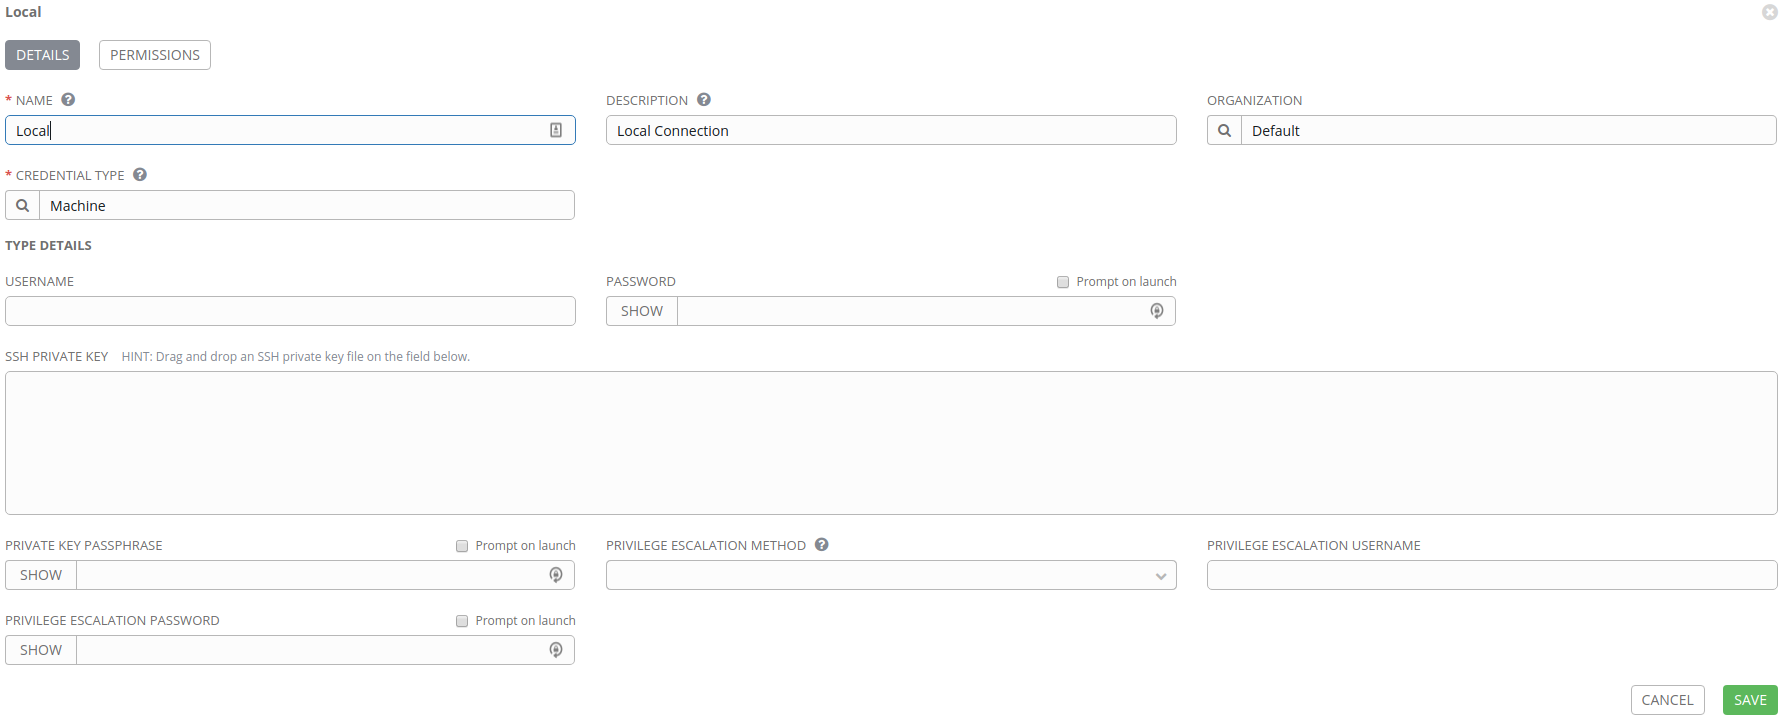
There shouldn’t be a need to populate anything, as we’ll later apply this to a
local Ansible connection in our inventory setup with
ansible_connection=local.
RDO-AWX connection
With this connection we need to generate an SSH key that we can use to connect to our virtual machines. If you have a connection setup to your cloud (like we setup in my blog post Deploying AWX to OpenStack RDO Cloud) then you can just run the following command which will result in a new keypair being created in your cloud. A private RSA key will be dumped to STDOUT, which you’ll then copy into the AWX web interface.
$ openstack --os-cloud rdocloud keypair create rdo-awx
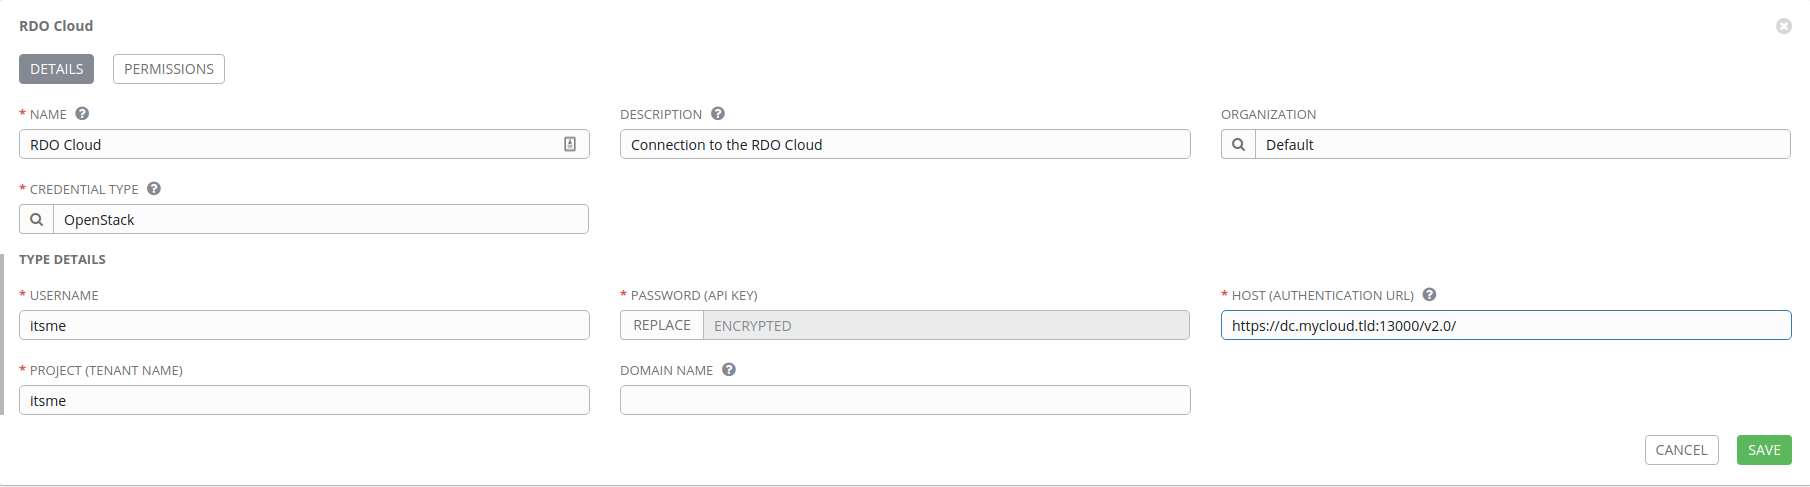
RDO Cloud connection
For our third and final connection, we’ll click the Add button and create an
OpenStack credential. First, select OpenStack under Credential Type and
populate the fields. You’ll need your OpenStack username, password, API URL,
and project.
Creating inventories
With our credentials all setup, we can start building our inventories. The inventories are where our jobs will be run against. We need to create two inventories; Local and RDO Cloud.
The Local inventory will simply be a local Ansible connection where our
openstack-inventory-builder project will be launched from, resulting in the
instantitation of virtual machines in our cloud.
The RDO Cloud inventory will contain a list of virtual machines and metadata that we can run our Kubernetes jobs against.
Dependency requirements
On your AWX host, you’ll also need
shadeinstalled to allow the Ansible playbooks to be run for provisioning and deprovisioning. In theopenstack-inventory-builderrepository (project) there is adependencies.ymlplaybook you only need to run once on the AWX host.We’ll create the dependency job in one of the upcoming sections.
Local inventory
The Local inventory will contain a single host; localhost. We’ll use the
Local inventory to execute our openstack-inventory-builder playbooks which
will result in a connection to the OpenStack API to instantiate our virtual
machines.
In order to allow the openstack-inventory-builder playbooks provision.yml
and deprovision.yml to operate, we need to feed it several variables. We’ll
configure the values for these variables in the Variables section of
the inventory.
First, click on the Inventories section of the left-side menu bar and then click Add. Select Inventory for a standard inventory object.
Name the inventory anything you want (I used Local) and optionally set a Description and Organization (I’m using the Default organization).
Next, you need to setup the Variables section, which are values that we’ll
pass to the openstack-inventory-builder job. I’ve documented that variables
and configuration on the GitHub repo for openstack-inventory-builder, so I won’t repeat everything here,
but here is an example set of values you should enter into the Variables
field under the yaml document top indicator ---.
---
cloud_name_prefix: AWX
cloud_region_name: regionOne
cloud_availability_zone: nova
cloud_image: 42a43956-a445-47e5-89d0-593b9c7b07d0
cloud_flavor: m1.medium
cloud_key_name: rdo-awx
my_auth_url: https://dc.mycloud.tld:13000/v2.0
my_username: itsme
my_password: ehrmegherdmyp4$$!
my_project_name: "itsme"
The big things to note here are the cloud_key_name which must match the name
of the keypair you created in the Credentials section for RDO-AWX. You’ll
also need to configure the authentication to the cloud with the my_*
variables like we did in the RDO Cloud credentials section. (I couldn’t ever
really figure out how to get AWX to properly read a clouds.yaml file, so this
was my work around…)
You’ll also need the cloud_image value. You can get a list of valid image IDs
by running openstack --os-cloud rdocloud image list. For
kube-centos-ansible I’m using the ID the corresponds to the image providing
me CentOS 7 x86_64 GenericCloud 1706.
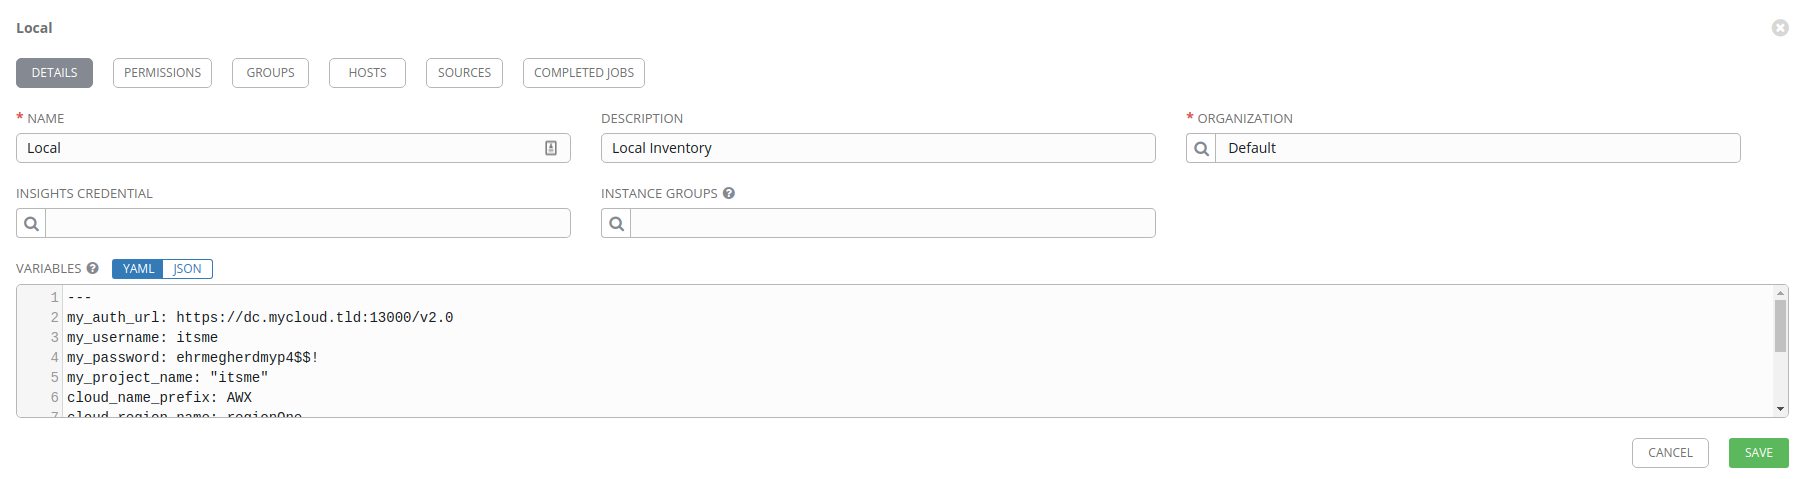
Now you can click on the Save button.
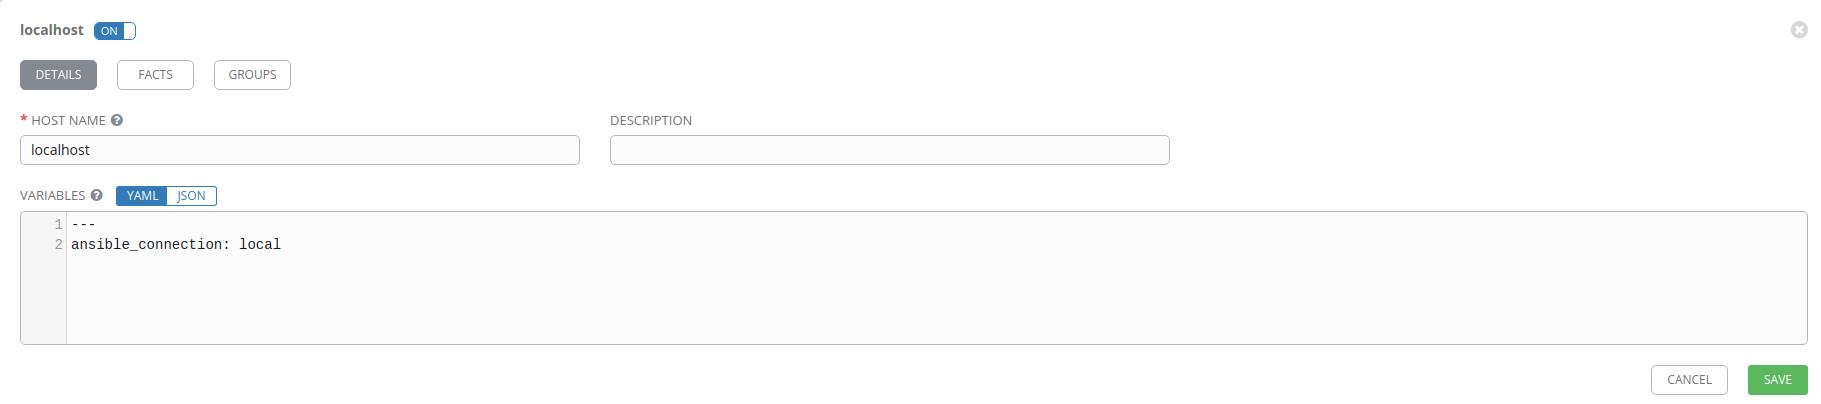
Create the host
For our Local inventory we’ll need to add a host; localhost. Once you’ve
saved your Local inventory you should be able to click on the HOSTS tab. In
the HOSTS tab, click on Add host.
Set the Host name to localhost and put ansible_connection: local in the
Variables field under the ---. Using ansible_connection: local keeps us
from having to connect to the machine locally via SSH.
Cloud inventory
We’re making good progress now and nearing the fun stuff shortly. With our local inventory sorted, next we need to configure our cloud inventory. The cloud inventory will get used after our provisioning and deprovisioning happens, and will be the workhorse for the more interesting jobs, like deploying Kubernetes into our cloud.
Like before, start by clicking on Inventories and Add a standard inventory object.
Name the inventory anything you’d like (I used RDO Cloud) and optionally set a Description and Organization (again, I used Default).
When you’re done setting that up, click on Save.
For our Local inventory we added a static host manually called localhost.
In this case, our cloud inventory is dynamic, and we want AWX to automatically
update the inventory for us prior to running our jobs. We need this because our
inventory is not static in the cloud, since we’ll be tearing down the virtual
machines and spinning up new ones each time we run the Kubernetes deployment
job with kube-centos-ansible.
Creating inventory sources
Obviously a static inventory isn’t going to work for this setup, so we’ll populate the hosts dynamically by using a Source.
Click on the Sources tab in your RDO Cloud inventory, and click on Add Source.
First, select the drop down under Source and pick OpenStack.
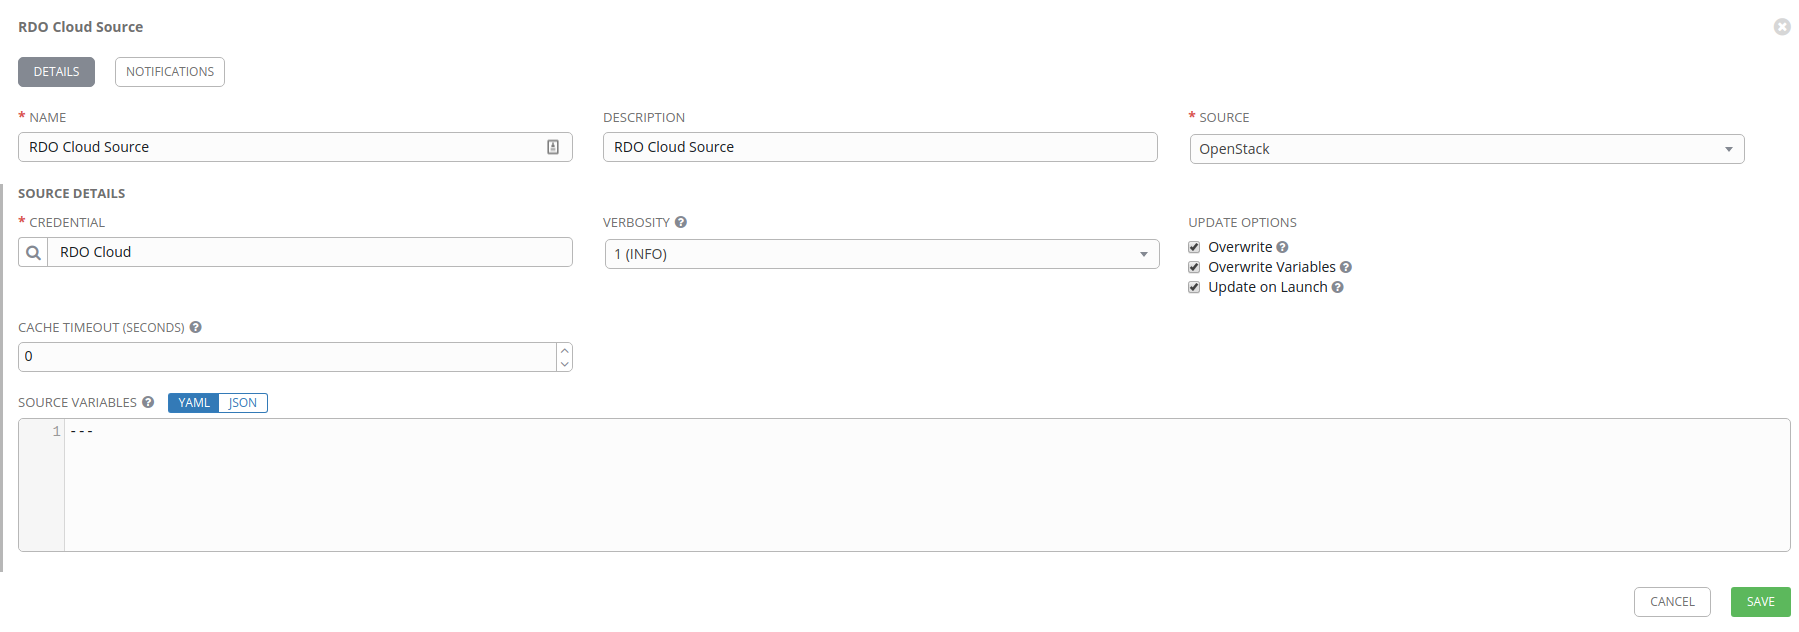
Set your Name and Description, and then use the magnifying glass icon to search under the Credential header. We’ll use our previously defined RDO Cloud credential which will allow AWX to connect to the OpenStack API and pull down various amounts of metadata about the state of our virtual machines.
I then setup the various Update Options as well. These include:
- Overwrite: remove old hosts during an update
- Overwrite Variables: avoids doing a variable merge and prefers the external values (NOTE I probably don’t need this)
- Update on Launch: any job that uses this source will result in an inventory update before launching the job
When you’re all done setting this up, click on Save.
Creating job templates
And we’re into the home stretch! We can create our job templates now and start
launching jobs. The first job we’ll setup is the previously mentioned
dependencies.yml playbook from the openstack-inventory-builder project.

Create the OpenStack Setup job template
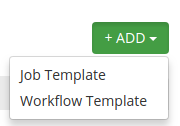
Click on the Templates menu item on the left of the browser window and select Add. Now select the Job Template object.
Our first job template is going to be OpenStack Setup which we’ll just launch manually after we create it to get the AWX machine ready for the other job templates we’ll create next. The following diagram shows the configuration for this setup. The main components we’re worried about include:
- Inventory: Use the Local inventory
- Project: Use the
openstack-inventory-builderproject - Playbook: Select the
dependencies.ymlplaybook - Credential: Use our
Localmachine credential
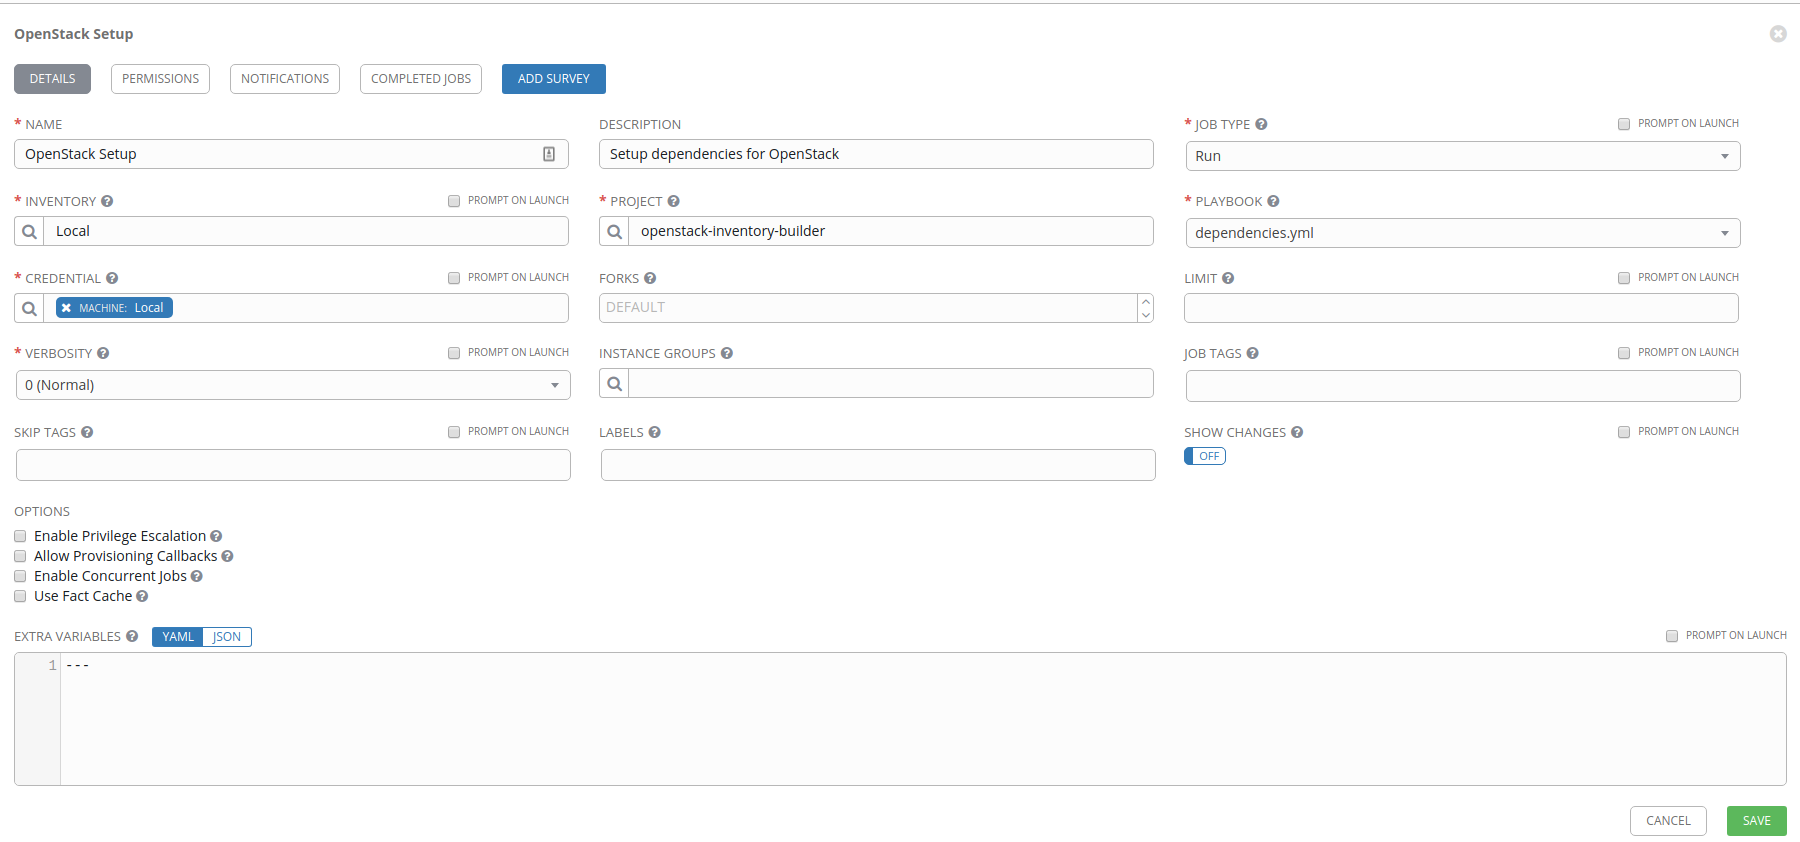
When you’re done configuring your job template, click Save.
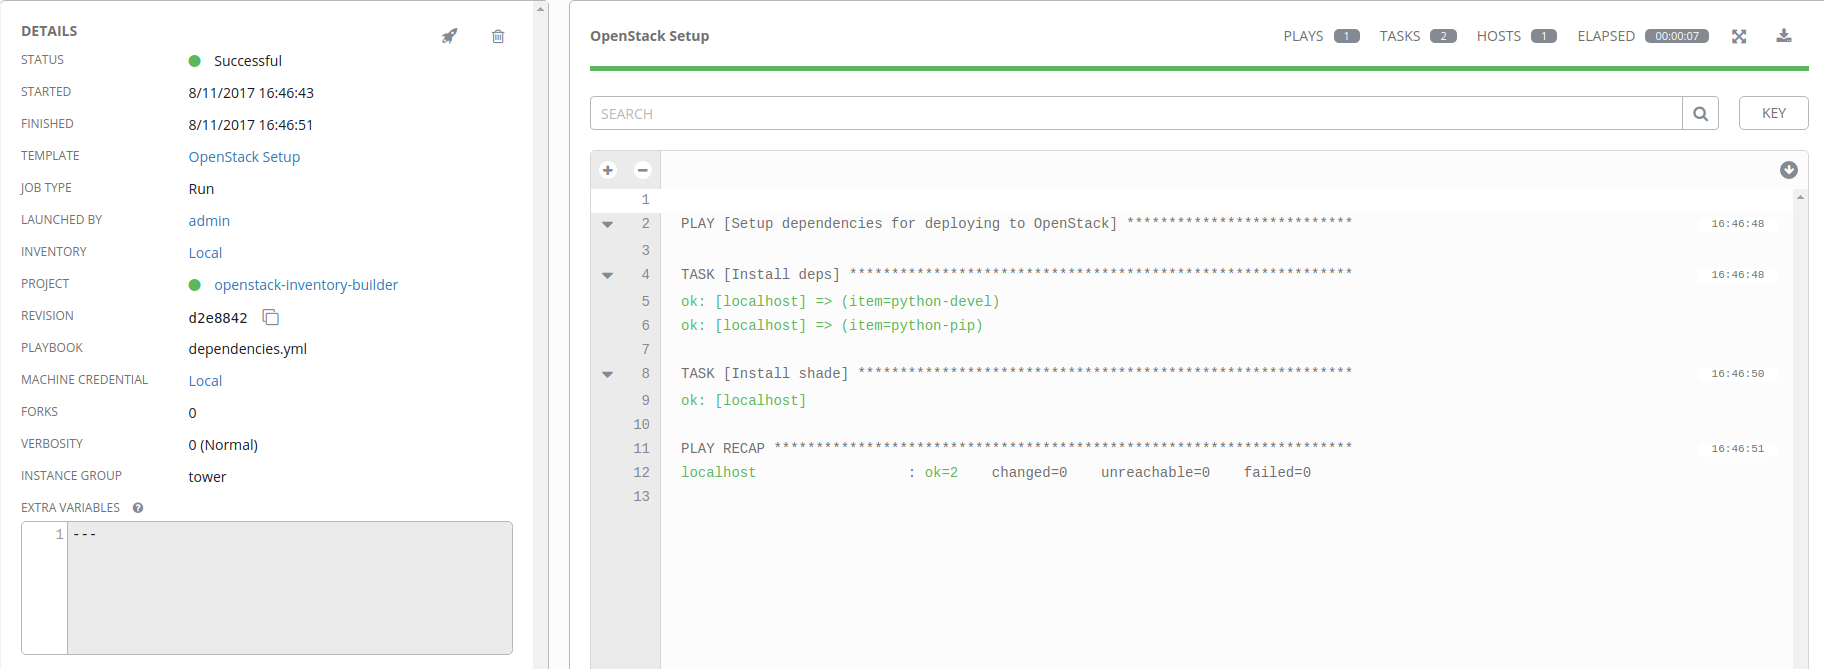
Run the OpenStack Setup Job Template
Before we go and build out all our jobs, now is an excellent time to test our
setup and make sure everything is working. As long as everything has been done
correctly, we should result in the git pull of our
openstack-inventory-builder project, and Ansible running the
dependencies.yml playbook local to our AWX virtual machine.
In the Templates section, you should have a single entry called OpenStack Setup. Under the Actions section on the right side of the browser window you should see a rocketship icon. Click on that icon, and your job will launch.

Once you’ve launched the job, you’ll be taken to a window showing you the
progress of the job run. If you forgot to add the ansible_connection: local
variable to your localhost host configuration, you’ll see something like
this:

If all goes well, you’ll have a successful job run that installs a couple of required depencies for our upcoming job templates.
Create the virtual machine (de)provisioning jobs
Great! We know that we can run a job now. The next step is to build out two more jobs; virtual machine provisioning and deprovisioning.
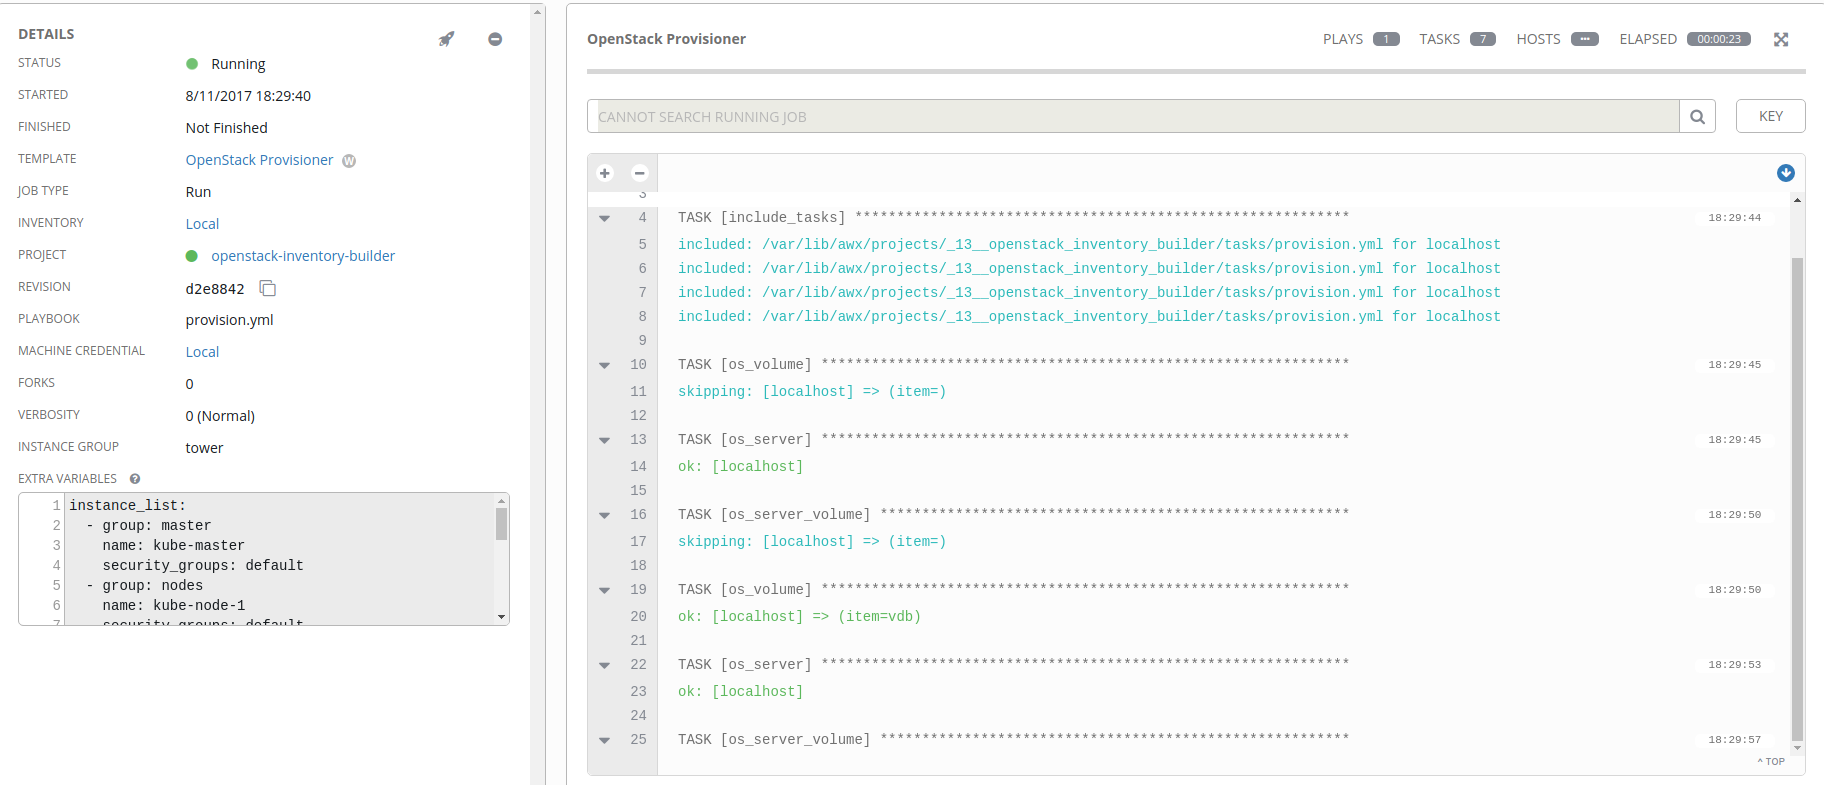
As before, go to Templates, click on Add, and select the Job Template object. Name your job OpenStack Provisioner and fill in the following fields:
- Inventory: Local
- Project:
openstack-inventory-builder - Playbook:
provision.yml - Credential: Machine: Local
- Options
- Use Fact Cache: enabled
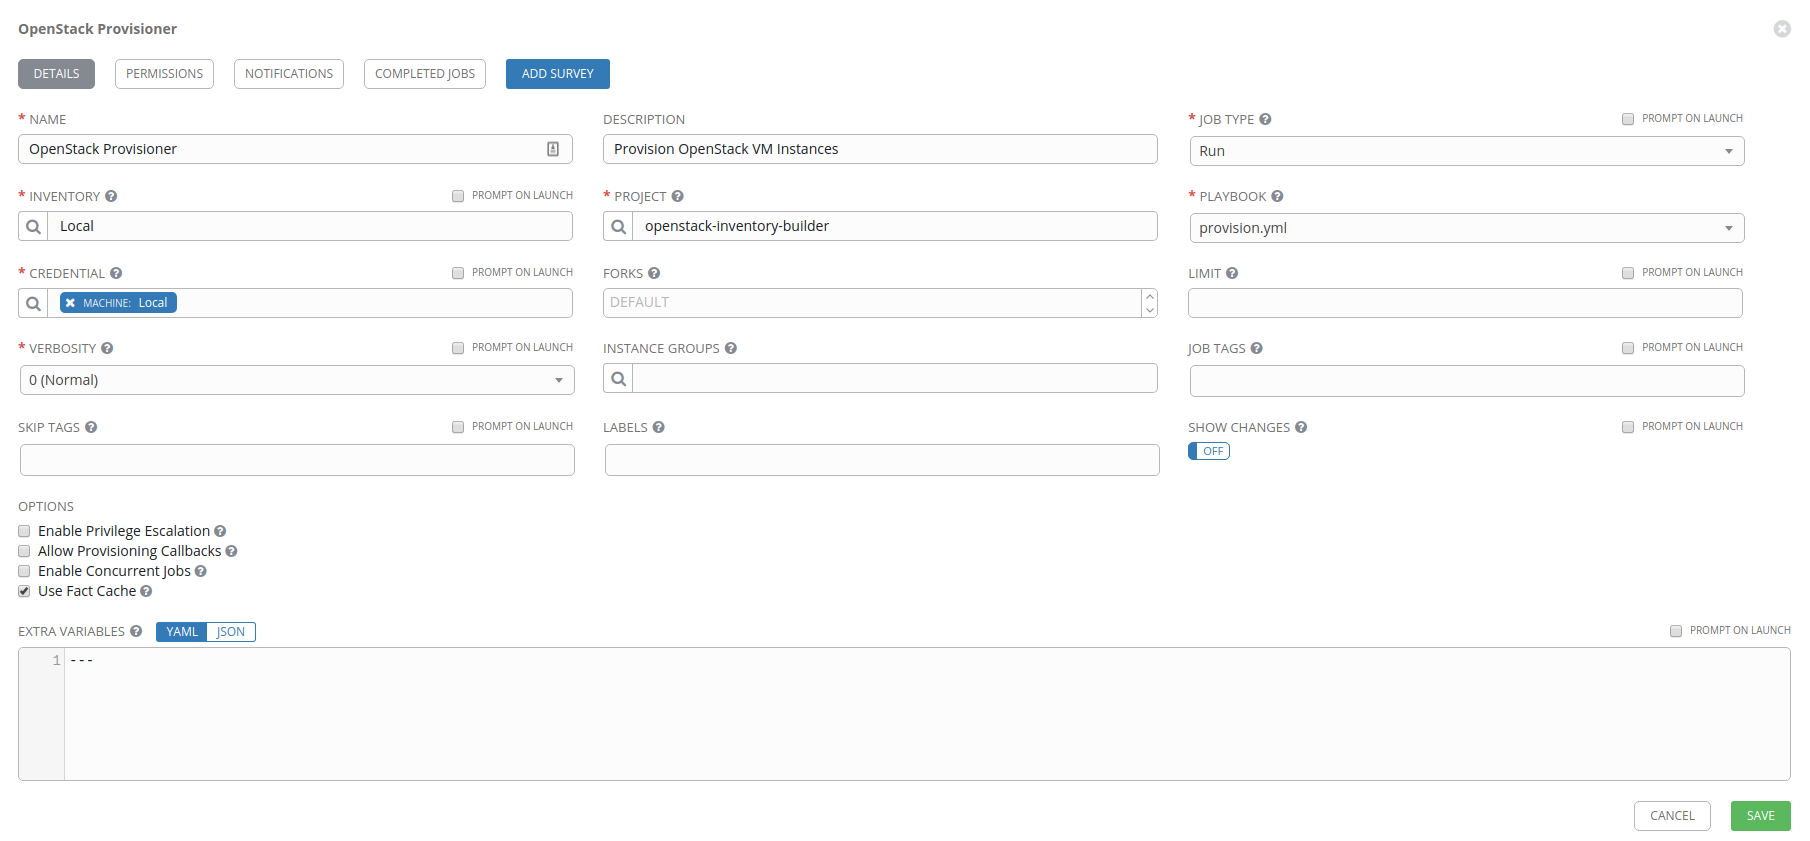
Now that you have the
provision.ymlplaybook setup, go back to the Templates section and do the same setup, but for thedeprovision.ymlplaybook. We’re going to make use of these in the next section.
Creating a workflow template
With both our OpenStack Provisioner and OpenStack Deprovisioner jobs setup, let’s make use of them!
You may be wondering, “How does the provisioning and deprovisioning jobs know what virtual machines to spin up and tear down?”. Excellent question!
If you read through the openstack-inventory-builder documentation on
GitHub
you may notice a variable called instance_list that defines the virtual
machines we’re going to instantiate. By using this list, we can build different
topologies using our OpenStack Provisioner and OpenStack Deprovisioner jobs
and defining the virtual machines we want to bring up independent of those
jobs.. By separating the instance_list from our (de)provisioning jobs, we can
re-use them, and build different setups!
We accomplish the different topology setup magic with a Workflow Template.
Configuring our first workflow
A workflow template is mostly a meta job that allows you to build chains of jobs
together. We’re going to make use of a workflow template to build out our
environment first (create our virtual machines). Later, we’ll enhance this by
using kube-centos-ansible to create a Kubernetes cluster across 4 virtual
machines.
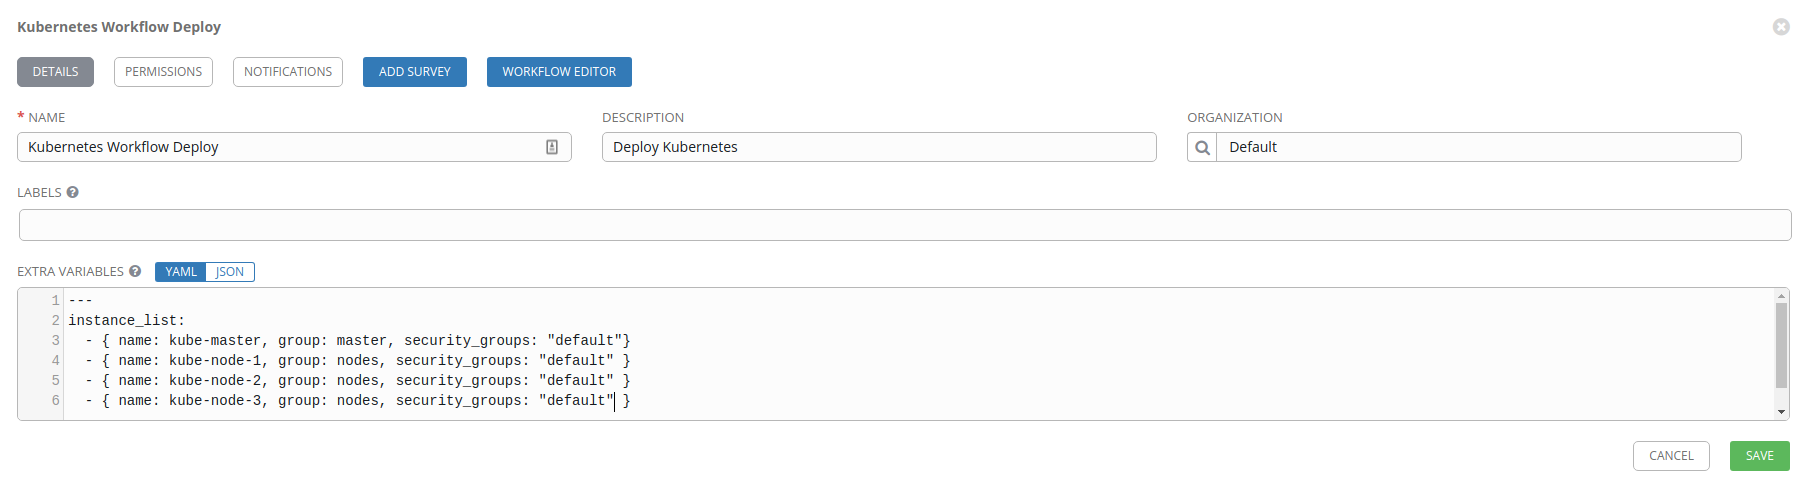
To create a workflow, click on Templates in the menu, click on the Add button, and select the Workflow Template object.
Just like with a regular job template, set a Name (Kubernetes Workflow Deploy), Description (Deploy Kubernetes), and Organization (Default).
The next part is what defines the virtual machine objects. In the Extra
Variables section, create a list of virtual machines we want to spin up within
the instance_list variable.
---
instance_list:
  - { name: kube-master, group: master, security_groups: "default"}
  - { name: kube-node-1, group: nodes, security_groups: "default" }
  - { name: kube-node-2, group: nodes, security_groups: "default" }
  - { name: kube-node-3, group: nodes, security_groups: "default" }
Defining our instance_list as above will create 4 virtual machines; one
Kubernetes master, and 3 Kubernetes nodes. We’ll assign the kube-master VM to
the master group, and the remaining VMs to the nodes group. These group
names will be used by Ansible when we run kube-centos-ansible to determine
how to setup the virtual machines. Additionally, we assign the default
security group (in OpenStack) to the virtual machines.
OpenStack Default Security Group
In my OpenStack project, I’ve defined two networks; public and internal. The public network is the subnet that allows me to get a floating IP for the virtual machine, allowing it to be accessed from the internet. The internal network is where the virtual machines connect through a virtual switch, and allows all virtual machines on that broadcast domain (LAN) to speak with each other.
For this project, I’ve setup my
defaultsecurity group to allow all connections between virtual machines on the same LAN via an Ingress rule, i.e. TCP/UDP, port 1-65535, 192.168.1.0/24. You may want to setup your security groups more restrictive. By default, thedefaultconfiguration in most clouds will not be sufficient, so you’ll need to adjust the security groups to suit your topology.
To start, you may wish to just test with a single line in the instance_list
instead of all four items, but suffice it to say, once you get your list the
way you want it, click the Save button!
Building the workflow
With our workflow template initially setup, we need to load the Workflow Editor to create the actual job workflow. Click on the Workflow Editor tab and it’ll open a new screen showing you a Start icon in the middle of the screen.
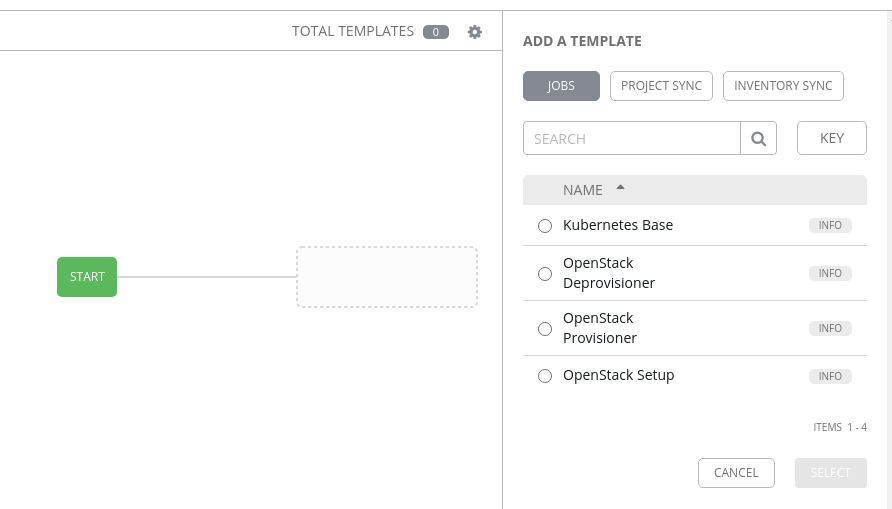
On the right side, we can select from one of three object types:
- Jobs
- Project Sync
- Inventory Sync
During our inventory and project configuration, we selected all the extra options so that those objects would update when they were called by a job. If we didn’t set that up, we could have either created a period schedule to update the projects and inventory from the cloud, or added a separate workflow step here to perform an inventory and/or project update prior to running any jobs.
That’s the great thing about workflows; they are incredibly flexible. You can pick where in the workflow an inventory or project needs updating, run several jobs in parallel, and control branching based on a job executing successfully or as a failure.
For now though, we’re going to keep things simple. We want to first make sure we can create our virtual machine(s). To do this, select the OpenStack Provisioner job on the right, and click on Select.
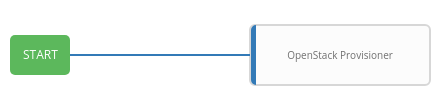
If you hover over the OpenStack Provisioner box, you’ll see a + and an x
which allows you to add to the workflow, or remove a workflow item. We’ll use
that when we start to build out a more elaborate setup, but for now, let’s save
this and test it out.
Testing the workflow
Before we get too crazy and build out elaborate workflows with grace and panache, we’re going to test and make sure things are working as they should. With our workflow template saved, naviate back to the Templates page.
Like we did earlier when we tested the OpenStack Setup job, click on the rocketship icon to launch the job. Once you click on that, you’ll be taken to the following screen.
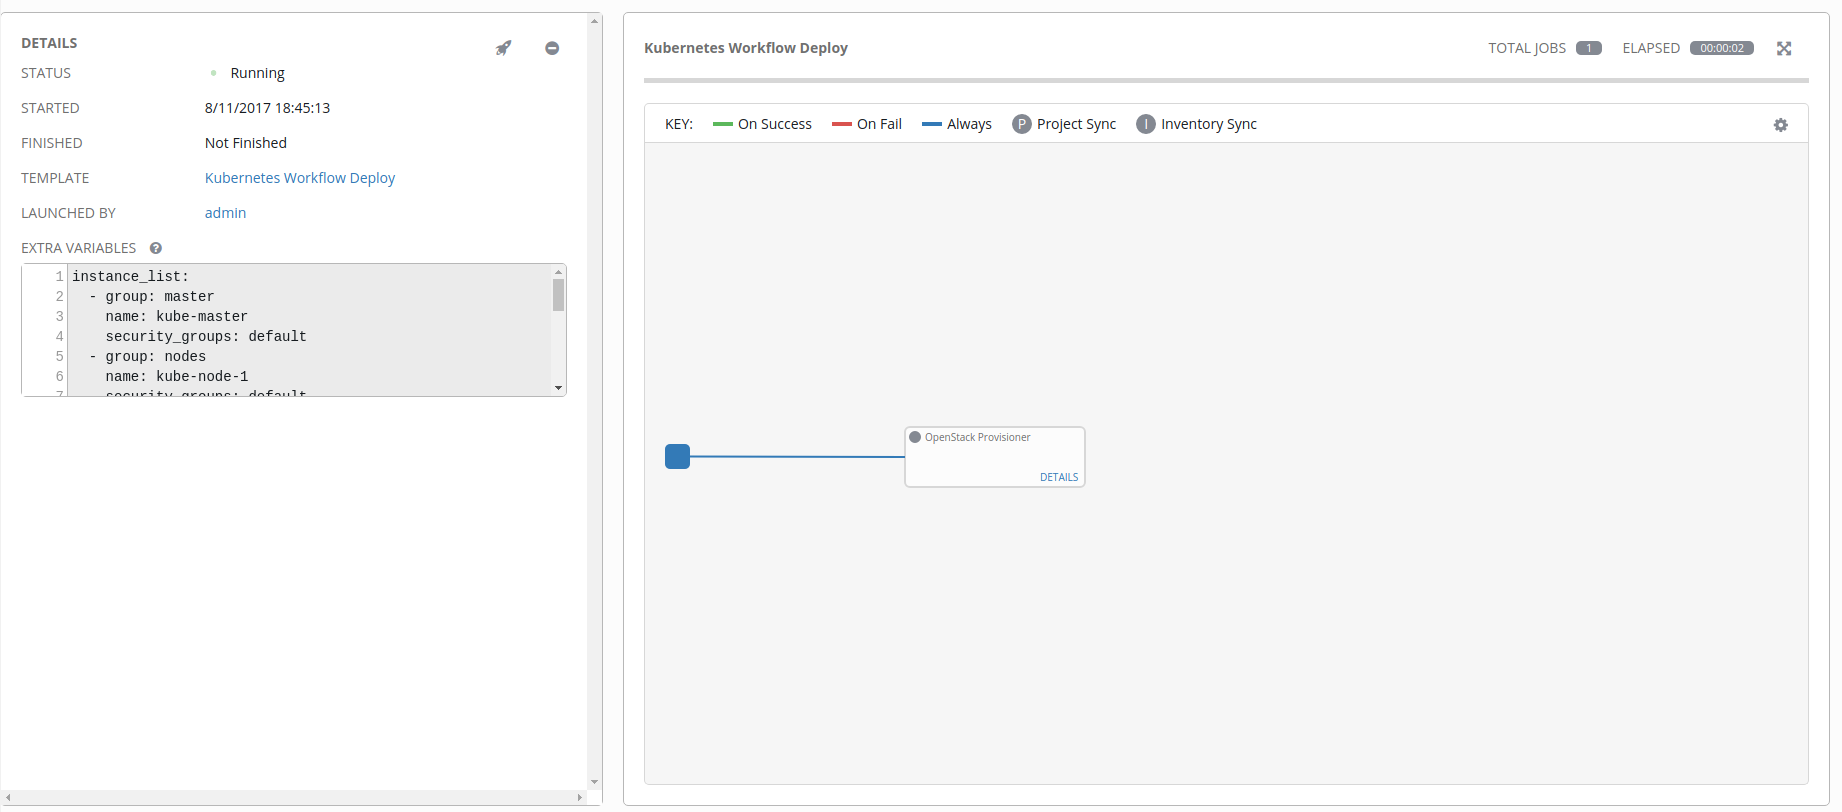
If you click on the Details link inside the workflow item box, you’ll be taken to the Ansible run console output where you can monitor the progression of the job.
Ideally everything will go well for you, and we’ll result in one or more virtual machines being spun up!
What’s Next?
At this point, you could probably experiment and start building out workflows and launching jobs. In another blog post I’ll show how I chain jobs together in workflows to build out a Kubernetes environment, schedule those for periodic runs, and report the status of those jobs to a Slack channel.
So far, I’ve been pretty impressed with AWX and all the things that it does. In an environment that requires more elaborate CI infrastructure, including a more fluid and automated job configuration setup, AWX might not be the proper tool. But in my simple use case of “spin up some basic CI and get back on with it”, AWX really appears to be a pretty nice little tool that can be brought up and configured quickly so that I can get back to what I was doing.
After I got all of this configured and working as a proof of concept, I
started looking at the tower_... Ansible modules, which (in theory) allow me
to automate the configuration of my AWX deployment itself, which would
certainly be a win in configuration management department.
Unfortunately, the state of the tower_... modules does not really permit that
reality. The tower_... modules in the current release of Ansible only work
with tower-cli version < 3.2.0 (which is used as a library to communicate
with AWX / Tower). In tower-cli 3.2.0, they changed from Tower API version 1
to version 2, and that broke the tower_... modules. Additionally, tower-cli
3.1.8 doesn’t have all of the configuration abilities that 3.2.0 has,
including ability to add an inventory source.
I’m hopeful that as more people start consuming AWX, that the Ansible modules will catch up and things will stabilize. When that time happens, the configuration management of AWX will be incredibly powerful, allowing for even more elaborate scenario configurations, centrally managed. You could even potentially run an AWX instance that managed multiple AWX instances… (insert yo dawg joke here).
It should also be noted that the deployment of AWX I’m building on right now isn’t production ready or scalable, as it instantiates a handful of containers on a single virtual host using Docker. Persistent storage isn’t done correctly, and a lot of things seem to be glued together in a way that isn’t all that flexible. If I was going to be using this in a long-life deployment, I’d likely look at deploying the components into something like OpenShift, allowing Kubernetes to manage the lifecycle of the containers, along with proper persistent storage via GlusterFS and Heketi.
What I set out to do was to see just how crazy sauce Doug’s initial idea was. Personally, I think it looks like AWX has a role in a CI environment going forward, but I’m more interested in what the community thinks. Leave comments here, or reach out to me on twitter.
Happy AWXing!