yakLab Part 1c: Bootstrapping Bifrost with Ansible
Aug 4, 2017 · 13 minute read · Commentsautomationbifrostbaremetalyaklabansibledevops
In this scene I’ll explore some of the bootstrapping I’ve been working on for a while that will result in a clean, shiny new Bifrost deployment, populated with inventory, executed from your laptop to a virtual machine.
Bifrost is an OpenStack project that utilizes OpenStack Ironic to provision baremetal nodes. This is related to my previous post on Building the virtual Cobbler deployment.
NOTE
Also to note this blog post makes the whole endeavour seem a lot more complicated than it really is. I’m mostly giving you all the background, overview, and lab topology so that things make a lot more sense so that you’ll be successful in your own local deployment (as not all networks are created equally :)).
Assumptions
- You’re running KVM / libvirt on your virtual host
- You’ll be deploying a CentOS 7 virtual machine
- Your baremetal nodes can be controlled via IPMI
- Your network is setup the same as mine :)
Less Automation Quickstart
This is pretty much what the documentation tells you to do. It works, and it doesn’t take very long to setup. The issue I have is that it then leaves you to your own devices to add your inventory. I’d like to automate that part of the bootstrapping process as well.
    ssh admin@bifrost.remote
    sudo yum install git -y
    git clone https://github.com/openstack/bifrost
    cd bifrost
    ./scripts/env-setup.sh

    * edit bifrost/playbooks/inventory/group_vars/*

    ansible-playbook -i playbooks/inventory/target playbooks/install.yml
Also, it installs Ansible via pip and the version installed by default is
Ansible 2.1.6.0 (which is starting to get fairly dated). While use of the
env-setup.sh is convenient to get all the dependencies bootstrapped, it is a
pain to use with Ansible to automate the deployment, as you start having to
much around with virtual environments.
Instead of using env-setup.sh we’ll install some dependencies then let
Bifrost install any other dependencies it needs after the fact.
A More Automated Bootstrap
Both @dougbtv and I have been working on some bootstrapping Ansible playbooks that will also bring in your inventory, and generally make it a little easier to import a set of hardware initially.
Most of the work is just basically what you need to do after you run the quickstart, but then if you destroy your Bifrost install, you have to do all that data entry again. So we automated your automation.
Yes, that’s right folks, we’re going to run Ansible with Ansible! (It’s not Ansible running Chef or Puppet though… so… cool?)
All the work is going into the repo at https://github.com/dougbtv/droctagon-bifrost and my development branches are currently located at https://github.com/leifmadsen/droctagon-bifrost
The Topology
In my lab, I have multiple low power nodes that I used for deployment testing. They are wired up with IPMI so that I can remotely power them on and off, and then they are provisioned from a virtual machine running Bifrost.
Here is a diagram of the physical topology of the lab:
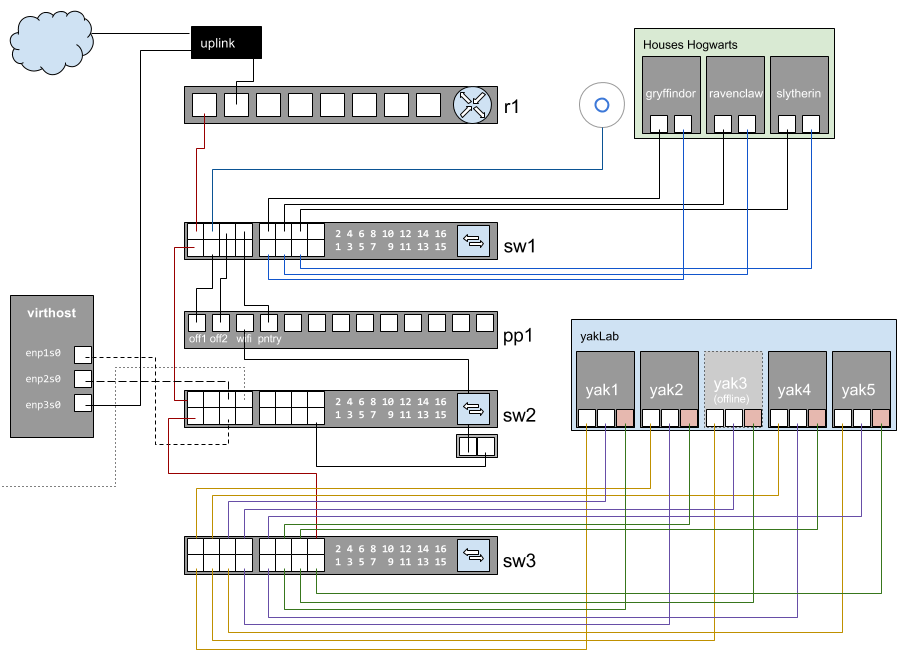
Bifrost lives on the virthost using a bridged interface to service the IPMI and provisioning interface. The IPMI interfaces (green) are statically assigned IP addresses on the 192.168.25.0/24 subnet. Bifrost then advertises DHCP for the provisioning interfaces in the same subnet, between 192.168.25.64 and 192.168.25.95 (yellow).
The other network interface (purple) is then provided by my main router via DHCP using the 192.168.26.0/24 subnet (which provides internet access via the uplink).
The Logical Topology
So that you understand where things are on the network, here is the logical topology.
VLANs
VLAN 25: IPMI and provisioningVLAN 26: Uplink / public network (internet)VLAN 50: Storage (future, for persistant storage with GlusterFS)
Switch Configuration
sw3, port 1-5- VLAN 25
- tagged VLAN 50
- First port on yak machine
sw3, port 6-10- VLAN 26
- tagged VLAN 50
- Second port on yak machine
sw3, port 11-15- VLAN 25
- Third port on yak machine (marked red)
sw3, port 16- VLAN 1
- tagged VLAN 25, 26
- uplink to sw2
Switch Port Assignments
sw3, port 1-5: Provisioning Network (DHCP from Bifrost)sw3, port 6-10: External Network (DHCP from r1)sw3, port 11-15: IPMI (static IP addresses)
Quick Deploy The Virtual Machine
I’ve discussed how to build out virtual machines with kickstart files and
virt-install with libvirt
previously, but here is a quick refresher on the commands I used.
First we stop (destroy) the existing machine, undefine (delete) it, then re-instantiate it using a kickstart file (also below).
virsh destroy yakLab-bifrost
virsh undefine --remove-all-storage yakLab-bifrost
virt-install --name "yakLab-bifrost" --memory 2048 \
--disk /home/libvirt/images/yaklab/bifrost.qcow2,size=20,bus=virtio \
--location /var/lib/libvirt/images/CentOS-7-x86_64-Minimal.iso --boot cdrom \
--network network=host-bridge --noautoconsole --vnc \
--initrd-inject kickstart/bifrost.ks --extra "inst.ks=file:/bifrost.ks" \
--accelerate && \
watch -g -n10 "virsh list --all | grep yakLab" && \
virsh start yakLab-bifrost
And here is my currentl kickstart file for the Bifrost virtual machine.
cat kickstart/bifrost.ks


#version=DEVEL
# System authorization information
auth --enableshadow --passalgo=sha512
# Use CDROM installation media
cdrom
# Use graphical install
graphical
# Run the Setup Agent on first boot
firstboot --enable
ignoredisk --only-use=vda
# Keyboard layouts
keyboard --vckeymap=us --xlayouts='us'
# System language
lang en_US.UTF-8

# Network information
network --bootproto=static --ip=192.168.25.251 --netmask=255.255.255.0 --gateway=192.168.25.254 --nodns --nodefroute --onboot=yes --device=eth0 --ipv6=auto --activate
network --hostname=bifrost.yakmgmt.61will.space

# Root password
rootpw --iscrypted $1$S7..$up3r$3cr3TstUff/
# System services
services --enabled="chronyd"
# System timezone
timezone America/New_York --isUtc
user --groups=wheel --name=admin --password=$1$S7..$up3r$3cr3TstUff/ --iscrypted --gecos="admin"
# System bootloader configuration
bootloader --append=" crashkernel=auto" --location=mbr --boot-drive=vda
autopart --type=lvm
# Partition clearing information
clearpart --none --initlabel

reboot

%packages
@^minimal
@core
chrony
kexec-tools

%end

%addon com_redhat_kdump --enable --reserve-mb='auto'

%end

%anaconda
pwpolicy root --minlen=6 --minquality=50 --notstrict --nochanges --notempty
pwpolicy user --minlen=6 --minquality=50 --notstrict --nochanges --notempty
pwpolicy luks --minlen=6 --minquality=50 --notstrict --nochanges --notempty
%end
Post Install Manual Tweak…
For now, I need to add another interface with Network Manager to the virtual host on boot. I haven’t figured out why when I do it with the kickstart file that the tagged VLAN interface doesn’t quite work. It’s pretty easy to run after the fact, and you’ll only need to do it once.
NOTE
Bifrost will run at static IP
192.168.25.251on the provisioning network. IPMI of yak machines 1 through 5 will live at static IP addresses192.168.25.1through192.168.25.5.
Let’s add the external network to our virtual machine by logging into it, and
running nmcli.
ssh admin@192.168.25.251
sudo nmcli con add type vlan id 26 dev eth0
Bootstrapping The Virtual Machine
There are always a few things I like to do to a machine once it has been instantiated, and instead of running all that manually, I create a little Ansible bootstrap playbook.
The primary reason I bootstrap the nodes, is so that the admin user (as
created by kickstart and virt-install) can sudo to root without a password.
It makes using Ansible a little easier in the next steps.
On your control machine (laptop, desktop), clone my ansible-bootstrap
repository.
cd ~/src/github/leifmadsen/
git clone https://github.com/leifmadsen/ansible-bootstrap
cd ansible-bootstrap
Then you’ll want to create a new inventory file. There is an example in
inventory/example.inventory. You can cat the following file contents into
the local.inventory file. Don’t worry, everything except the example is
ignored, so you won’t clutter up the git repo.
cat > inventory/local.inventory <<EOF
bifrost ansible_host=192.168.25.251

[nodes]
bifrost

[nodes:vars]
ansible_user=admin
ansible_ssh_pass=your_super_secret_from_kickstart_file
ansible_become=true
ansible_become_pass=welcome
ansible_become_user=root
And now we can bootstrap the node by running ansible-playbook.
ansible-playbook -i inventory/local.inventory site.yml
Feel free to clone this bootstrap and add anything you want. If there are other cool bootstrap things you think all machines should have, feel free to open a pull request. Of course, the bootstrapping is biased towards my preferred machine deployment, and your bootstrapping needs may differ.
Clone The Dr. Octagon Bifrost Repository
On your control machine, clone the Dr. Octagon Bifrost repository, which contains the Ansible playbooks we’ll run in a few minutes.
cd ~/src/github/dougbtv/
git clone https://github.com/dougbtv/droctagon-bifrost
cd droctagon-bifrost
Building Our Inventory
One of the most time consuming parts of deploying Bifrost is really just gathering up the information about your hardware, setting the IP addresses for your IPMI interfaces, documenting the MAC addresses for the provisioning network interfaces, and putting all that data into JSON (or in our case, YAML because we’re going to generate the JSON inventory with our Ansible playbook).
In order to make it easier to generate the inventory and keep a bunch of your data in a single file, we’ve created a template that will generate the inventory for you. However, you’ll still need to enter the aforementioned data into a YAML file.
We’ve provided an example inventory for you in the inventory/example/
directory. You can start with this by copying it, or building out your own from
scratch.
I copied the example inventory directory to staging with cp -r
inventory/example/ inventory/staging/ and then put in the contents of my
hardware into the inventory/staging/group_vars/bifrost.yaml. Here is my local
example for the yakLab.
---
bifrost_version: "master"
pxe_boot_nic: "eth0"
pxe_boot_server_ip: "192.168.25.251"
pxe_dhcp_start: 192.168.25.64
pxe_dhcp_end: 192.168.25.95
bifrost_inventory:
  - pm_addr: 192.168.25.1
    nickname: "yak1"
    mac: "D0:50:99:79:78:5D"
    cpu: 4
    memory: 16384
    disk: 110
    arch: x86_64
    pm_user: admin
    pm_password: admin
    uuid: "{{ 1001 | random | to_uuid }}"

  - pm_addr: 192.168.25.2
    nickname: "yak2"
    mac: "D0:50:99:79:77:A9"
    cpu: 4
    memory: 16384
    disk: 110
    arch: x86_64
    pm_user: admin
    pm_password: admin
    uuid: "{{ 1002 | random | to_uuid }}"

  - pm_addr: 192.168.25.4
    nickname: "yak4"
    mac: "D0:50:99:79:76:F7"
    cpu: 4
    memory: 16384
    disk: 110
    arch: x86_64
    pm_user: admin
    pm_password: admin
    uuid: "{{ 1004 | random | to_uuid }}"

  - pm_addr: 192.168.25.5
    nickname: "yak5"
    mac: "D0:50:99:79:77:77"
    cpu: 4
    memory: 16384
    disk: 110
    arch: x86_64
    pm_user: admin
    pm_password: admin
    uuid: "{{ 1005 | random | to_uuid }}"
WARNING
Using the
random | to_uuidfilter does result in a known bug currently. I probably just need to drop therandomfilter, since if you run this again, you’ll get conflicts from Bifrost when it tries to enroll the hardware, since the UUID will have changed in the template.
Stepping through this file, we’ve got a few things to note. First, the Bifrost
version we’re going to clone. In this case I’m using master, but you could
also use a branch name, or version tag.
The pxe_boot_server_ip is our static provisioning IP address we set up when
we instantiated our virtual machine. It’ll be the IP address that Bifrost will
advertise DHCP on with dnsmasq.
The pm_addr is the IP address of the IPMI interface you would have previously
configured. In my case I went through and statically assigned an IP address for
the nodes. You could of course have created another network and assigned them
via DHCP (if the machines you’re using provide it). In that case you’d probably
want to make sure you could communicate with them via a DNS name, but I haven’t
tried that (or set that up locally).
The mac value is the MAC address that Bifrost will look for when the nodes
boot up, then over the provisioning interface, request an IP address via DHCP
during the PXE boot process. The idea is that once the node has successfully
been provisioned, Bifrost will no longer server the required files to boot via
PXE on subsequent boots for that MAC address.
The pm_user and pm_password are the values for logging into the IPMI
management interface on your baremetal nodes.
We’re almost there!
Deploying Bifrost
OK, we’ve done all the hard work now. If things are setup properly on your network, then you’ll be able to deploy Bifrost to your virtual machine, and service the baremetal nodes over your bridged interface.
Moment of truth, time to run the Bifrost deployment.
From your droctagon-bifrost directory, run the following command.
ansible-playbook -i inventory/staging/ site.yml
Now be patient and let things progress. Hopefully it all finishes correctly, and that you’ve automated your deployment. At this point, you’re pretty much done, other than the actual deployment. So far, we’ve only brought the playbook as far as the enrollment process, so deploying the nodes is left as a separate, non-automated step.
Primarily, when I see a failure, it’s because…
- I don’t have the network setup quite correctly (can’t download packages from the external network),
- I’ve misconfigured something in the
bifrost.yaml(incorrect syntax, missing data, invalid data, etc) - Issue with Bifrost itself from upstream (not all that common actually)
- I’ve deployed it twice with the known
randomfilter bug I introduced
Next, let’s see how we can deploy our hardware.
Preparing To Deploy Our Baremetal Nodes
Now the fun part. Deploying an operating system and powering on the nodes remotely from the comfort of our virtual console. As part of our bootstrapping of Bifrost, we’ve resulted in a built CentOS image, and are now ready to deploy it to our baremetal nodes.
First, we need to SSH into our virtual host and run the commands there.
ssh admin@bifrost.yakdata.61will.space
(I’m setup with local DNS resolution for the 192.168.26.0/24 network that we added as a tagged VLAN interface, but you could just as easily login to the 192.168.25.251 static IP as well.)
OK, now that we’re logged into the Bifrost server, we need to do a couple of
preparatory steps. We’ll source the env-vars and export the
BIFROST_INVENTORY_SOURCE environment variable.
sudo su -
source /opt/bifrost/env-vars
export BIFROST_INVENTORY_SOURCE=/opt/inventory
(It’s highly likely in the future that I’ll add this to the .bash_profile on
the root user via the playbooks we ran earlier, but if you’re here early
enough, this isn’t done yet.)
Now let’s do a quick check that we’re ready to execute some commands. We can show our current inventory and it’s status.
ironic node-list

+--------------------------------------+------+---------------+-------------+--------------------+-------------+
| UUID                                 | Name | Instance UUID | Power State | Provisioning State | Maintenance |
+--------------------------------------+------+---------------+-------------+--------------------+-------------+
| 8d89f223-5514-50c9-a4a1-7537f2792cf6 | yak5 | None          | power on    | active             | False       |
| 5f99af1f-2cdb-5fa6-8c2f-85966a947a2e | yak1 | None          | power on    | active             | False       |
| fab35824-70e5-50db-9139-6baa099ed5a6 | yak2 | None          | power on    | active             | False       |
| ce499d7c-e16d-5740-a598-9985bfa11d00 | yak4 | None          | power on    | active             | False       |
+--------------------------------------+------+---------------+-------------+--------------------+-------------+
In this case, you can see that I’ve lazily shown you a post-deployment output
(you can tell because the Provisioning State is set to active meaning that
our nodes are fully provisioned and active). If you’ve just run the commands,
you’ll see that the Provisioning State should be set to available. If you
see anything else, likely something has gone wrong. (It’s possible enroll is
also a valid state to be in as well, so you could still proceed and see if it
works, but I’ve not tried deploying from that state.)
You may also see the Power State is a value of None. Sometimes the state
just isn’t necessarily readily available, depending how good your nodes IPMI
implementation is. I find that things will work fine even if initially the
state isn’t known. Your kilometerage may vary.
Deploying Our Baremetal Nodes
OK, we’ve done all the preparatory work, and we can finally try deploying our nodes.
First, change into the bifrost/playbooks/ directory on the Bifrost virtual
machine.
cd /opt/bifrost/playbooks/
And then we can run the following command to deploy our nodes dynamically (if
you get an immediate error, make sure you’ve sourced the env-vars file and
exported the BIFROST_INVENTORY_SOURCE to your path.)
ansible-playbook -i inventory/bifrost_inventory.py deploy-dynamic.yaml
I then watch the output of ironic node-list to see if the nodes are
deploying.
watch -n10 "ironic node-list"
We should see things in the wait call-back state, but those should eventually
change into active. Nodes that sit in wait call-back for a very long time
are likely to eventually time out and fail.
The main reason for this in my experience is that the nodes are not connecting to the Bifrost server over the provisioning network. It could either be failing to get an IP address from dnsmasq during PXE boot, or the MAC address being used on the provisioning network isn’t the correct network interface that was provided.
You can check some of this via journalctl -fu dnsmasq.service and via
journalctl -fu ironic*.
Conclusion
Hopefully this post gets you on your way to deploying Bifrost and managing the deployments of your baremetal hardware. I actually had quite a bit of a rocky road getting this far, but after trying several times, I finally understood how best to deploy Bifrost, and to automate the bootstrapping of the virtual machines. Now I can move onto more exciting things, and know that I can at least get my provisioning system going without too much trouble if I need to recreate it.
Additional documentation for Bifrost and using it is available at https://docs.openstack.org/bifrost/latest/