Create a virtual undercloud with TripleO Quickstart
Dec 28, 2016 · 5 minute read · Commentsnfvpetripleooooqvirtualizationopenstack
In this blog post I’ll discuss how I’m currently using TripleO Quickstart to instantiate a virtual machine on a remote virtual machine host from my workstation. In follow up blog posts I’ll discuss how to utilize the virtual machine to provision both virtual and baremetal overclouds from the virtual machine.
Topology
The topology for our lab environment is shown in image 1-1.
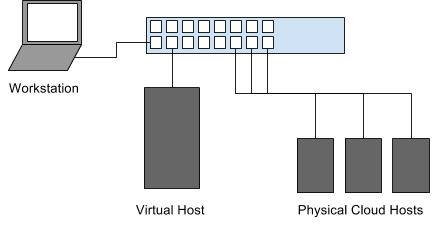
We have a laptop acting as the workstation (where we’ll do our work from), a virtual host (with lots of memory to run virtual machines), and 3 small physical hosts (Atom based) which will simulate nodes for a baremetal deployment.
Pre-requisites
We’ll be using TripleO Quickstart (referenced as oooq, or simply quickstart going forward) as our deployment mechanism. We’ll be doing this from our workstation to a headless virtual host on our network. In this blog post we’ll simply be deploying the undercloud and getting it ready for future blog posts where we’ll start to do some more elaborate deployments.
First, clone the oooq repository from https://github.com/openstack/tripleo-quickstart.git.
cd ~/src/github/
git clone https://github.com/openstack/tripleo-quickstart.git
cd tripleo-quickstart
Next we’ll need to validate a few things on the headless virtual host. Here are a couple things you need to validate:
First make sure you’ve copied your public SSH key into the remote host. In this
case, our remote host is 192.168.3.180 (and our workstation is some other IP
address in the same subnet, such as 192.168.3.160).
ssh-copy-id -i ~/.ssh/id_rsa.pub root@192.168.3.180
Once you’ve done that validate that you can ssh into the remote host without a password.
Next up is making sure our dependencies are installed on the remote virtual
host. We can redirect the contents of our local quickstart.sh file to the
remote host, and use the --install-deps flag.
ssh root@192.168.3.180 "bash -s -- --install-deps" < ./quickstart.sh
Now we should be mostly ready to get started on deploying our undercloud.
Initial Deployment
In our initial deployment I’m going to just deploy an undercloud using a NAT interface on libvirt which is the default method for oooq. When deploying an overcloud with physical machines, it may be desirable to have the virtual machine bridged to the network with a native IP on the subnet. I’ll delve into that in another post though.
NOTE If it hasn’t merged yet, and you’re using Fedora as your workstation and/or your virtual host, then you may need to cherry pick a patch I opened upstream which will tweak a couple of things that aren’t working by default on a Fedora based deployment. If you’re using RHEL or CentOS, then nothing should need changing:
git fetch https://git.openstack.org/openstack/tripleo-quickstart refs/changes/42/411442/7 && git cherry-pick FETCH_HEAD
Overrides file
In order to only deploy an undercloud, we’ll need to create an override file
that will clear out the default Ansible variables that would otherwise create
virtual machines for a single controller and single compute node. We’ll pass
this overrides file into quickstart.sh to avoid the build out of the
additional virtual nodes.
cat > overrides.yaml <<EOF
overcloud_nodes: []
EOF
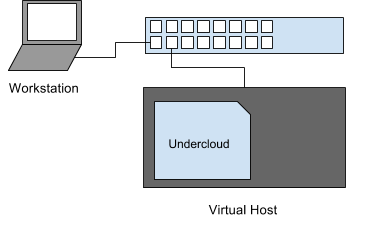
Deploying the virtual undercloud
Now we’re ready to deploy our virtual undercloud. The purpose of this is really to see what happens with a minimal configuration set, and build out a more elaborate environment from there.
./quickstart.sh --release newton \
  --no-clone \
  --clean \
  --tags untagged,provision,environment,undercloud-scripts \
  -e supported_distro_check=false \
  -e @overrides.yaml \
  --teardown all 192.168.3.180
We can step through this configuration to understand exactly what we’re doing here. We’re slightly more advanced than a full default deployment on localhost, but since our goal is to get a virtual undercloud operational, we’re beyond the default setup.
Let’s step through the various sections. In the first line it’s straight forward. Run the quickstart deployment, using the upstream Newton release (from RDO).
./quickstart.sh --release newton \
Next up, we have --no-clone, meaning to avoid cloning a new copy of the
upstream quickstart repository, and instead use our working copy (including any
local changes).
We also apply the --clean flag to clean out our working
directory during each run. The default working directory is ~/.quickstart/.
(You can override this with the --working-dir flag.)
--no-clone \
--clean \
I also want to avoid running the undercloud installation, as we haven’t created any configuration files yet, or provided the undercloud our deployment topology. At this point, we’re basically building a vanilla, pre-configuration undercloud with a copy of the deployment scripts.
Controlling the steps being run by quickstart can be done with the --tags
flag. In this case, run the environment and provisioning tags (the untagged
stuff as well), and deploy the undercloud scripts.
--tags untagged,provision,environment,undercloud-scripts \
You can find the default list of tags in the quickstart.sh file in the
DEFAULT_OPT_TAGS variable, whose current tag list is:
DEFAULT_OPT_TAGS="untagged,provision,environment,undercloud-scripts,overcloud-scripts,undercloud-install,undercloud-post-install"
Since I’m running from the Fedora (25) distribution, I have to override the
distribution check. We’re also going to pass the overrides.yaml file that we
created earlier to avoid any overcloud virtual machine instantation.
-e supported_distro_check=false \
-e @overrides.yaml \
Last step is to pass the --teardown all setting so that we create new virtual
machines each time we run this. If this isn’t what you’re instending to do,
just remove the --teardown flag. The final argument is the hostname (or in
this case, IP address) of the virtual host where we want to deploy.
--teardown all 192.168.3.180
Conclusion
After about 10 minutes (perhaps longer on initial deployment since overcloud images will need to be downloaded from the RDO project), you should have a shiny new undercloud machine in the pre-provisioned state.
You can validate this by SSH’ing into the virtual host, and running the virsh
command as the stack user.
ssh root@192.168.3.180
sudo su - stack
virsh list --all
Id    Name                           State
----------------------------------------------------
1     undercloud                     running
At the end of the quickstart run, you’ll see the ssh command that will allow you to proxy to the undercloud.
In subsequent posts, we’ll look at how to pass custom configurations to the undercloud, setup the undercloud for bridged networking, and how to use it to deploy a baremetal lab environment using composable services and roles.